Creating Your First R Package
There are already a lot of great resources1 that teach you how to make an R package. But I thought it would still be worthwhile to walk through how I created my first one – at the very least, it’ll be helpful for myself when I write my next R package.
Here is my step-by-step guide to building a (minimally functional) R package.
Step 1: Set up your packages and directory
To create your own R package, you will need to use two packages, devtools and roxygen2. devtools contains the functions for building a package, while roxygen2 helps generate documentation for the package using specially formatted comments.
library(devtools)
library(roxygen2)
Now navigate to the parent directory of where you want your R package directory to be located (e.g. R_packages, but it can be wherever you want it to be). Use the function devtools::create2 to create the folder for the R package, which I will call mypackage in this tutorial.
setwd("R_packages")
create("mypackage")
Your mypackage directory will now be under your parent directory. It should look like the following:
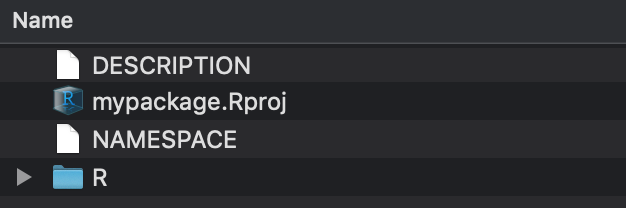
Contents of mypackage:
DESCRIPTION- information about the packagemypackage.Rproj- the R project fileNAMESPACE- information about what to import and exportR- a directory for your scripts, i.e. where your functions will go
At this point, I recommend that you make your R package a git repository and connect it to GitHub. To do so, navigate to https://github.com and create a new repository there with the same name (e.g. “mypackage”). Then run the following commands in your terminal.
cd mypackage # Navigate to mypackage directory
git init
git remote add origin https://github.com/albertkuo/mypackage.git
git add *
git commit -m "Initial commit"
git push -u origin master
Aside from the usual benefits that come with using version control, making your R package a GitHub repo means that later on, other people can easily install your package directly from GitHub (see Step 6).
Step 2: Write DESCRIPTION
Now open mypackage.Rproj in RStudio.3 Let’s edit the DESCRIPTION file first. You can do this in RStudio or with your favorite text editor. The DESCRIPTION file basically contains some information about the package. Below is an example (you will have to remove the “# comments” in your actual DESCRIPTION file).
Package: mypackage
Title: What the Package Does # One line only, Title Case, and no period
Version: 0.1.0 # see Jeff Leek's versioning convention
Date: 2019-12-14
Authors@R: c(person(given = "Albert",
                    family = "Kuo",
                    role = c("aut", "cre"), # "aut" means author (someone who has
                                            # made a significant contribution)
                                            # "cre" means maintainer (who to
                                            # contact if there are problems)
                    email = "albertkuo@jhu.edu",
                    comment = c("ORCID" = "0000-0001-5155-0748")))
Depends: R (>= 3.6.0)
Imports: dplyr # packages you need for the package, aka dependencies
Suggests: knitr # optional packages that aren't strictly needed
Description: What the package does, with more detail. # one paragraph
License: GPL-3
Encoding: UTF-8
LazyData: true
Note: The GPL-3 license seems to be a commonly recommended license for R packages. I found this guide to be a helpful start if you want to learn more about software licenses.
Step 3: Add functions and write documentation
It’s likely that you already have functions that you want to create a package for. Copy them into the R folder. Each function should be in its own separate file.4
Let’s say you have a script called my_function.R. We want to write specially formatted comments for it, i.e. the #' comments, so that roxygen2 can automatically build the documentation pages. Below is an example.
#' A very brief description of what your function does
#'
#' A detailed description of what the function does.
#'
#' @param print_statement a logical value indicating
#' whether to print the statement (default is \code{TRUE})
#'
#' @import dplyr
#'
#' @export
#'
#' @return \code{my_function} prints a declaration
#' announcing itself if the parameter is \code{TRUE}
#'
#' @examples
#' R code examples of how to use your function
#'
my_function <- function(print_statement = TRUE){
  if(print_statement){
    print("This is my function.")
  }
}
Some things I want to draw your attention to:
- Include
@exportif you want the function to be exported, i.e. visible to people who use the R package. - Include
@importfor any packages that are needed for this function. You can also import a specific function with@importFromto prevent name conflicts (e.g.@importFrom MASS lda).
Now we can generate the documentation files and NAMESPACE using roxygen2.5 This is as easy as typing the following command.
document()Your mypackage directory should now look like the following:
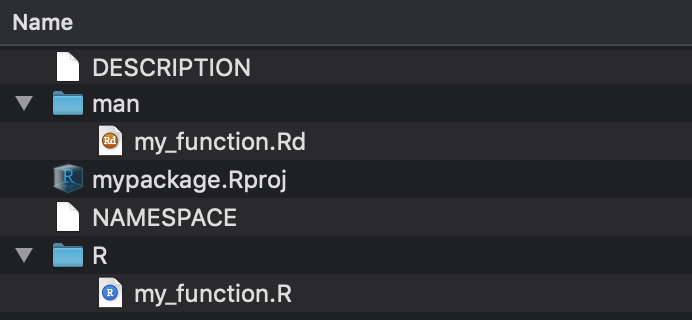
New contents of mypackage:
- In the
mandirectory are the documentation files. These are the help files you see when you type?my_function. - The NAMESPACE file tells you which functions you are exporting from your package and which packages/functions you are importing to be used in your package.
Every time you make changes to the comments, you will want to regenerate the documentation and NAMESPACE with the devtools::document() command.
(Optional) Step 4: Add internal data
Something that you might want to do is to use data internally within your R package. For example, your functions might require the use of some internal data that you want to load.
To do this, first run the following command.
use_data_raw("generate_internal")This will create an R script in data-raw/generate_internal.R, where you can put your code that generates the internal data. It will also add the data-raw/ directory to .Rbuildignore, since you won’t need it to build the package.
Then in generate_internal.R, you can generate and save the internal data.
# Generate data
x = 1:5
y = 1:10

# Save data
usethis::use_data(x, y, internal = TRUE)
The command usethis::use_data will save the objects x and y in R/sysdata.rda, which is a file specifically designed to hold internal data. Your functions will then be able to call the objects x and y whenever they are needed.
Step 5: Install your package
Believe it or not, your package is ready to be installed locally on your computer. This is simple to do with the devtools::install() command.
install()
library(mypackage)
Your package is now ready to be used! Any functions you’ve exported are available. For example, type my_function(). You can also access the help page you generated in Step 3, just like you would do with any other package’s functions, by typing ?my_function.
Future work
At this point, you have a basic R package that can be easily distributed. Even if you don’t share it with anyone, this is a great way to organize and use your own functions.6
To turn your R package into something more user-friendly, however, there are a couple more things you will want to do. One of them is to write tests for your R package to check for bugs and to “dummy proof” your functions. Another is to write vignettes to help people learn how to use your R package. Since these things go beyond what is strictly necessary for a functional R package,7 I will write about them in a later post.
For example, Hilary Parker’s brief tutorial or Jeff Leek’s guide or Karl Broman’s tutorial or Hadley Wickham’s book (in increasing order of detail).↩︎
In general, I don’t like specifying the package name when using functions because it is a lot of extra characters to type out. So I won’t do that in the code chunks of this blog post either, unless I think there is good reason to. However, I will try to do so when describing the functions in this blog post to prevent any ambiguity.↩︎
This ensures that you are in the correct working directory in RStudio, i.e. that your working directory from now on is
mypackageand not the parent directory.↩︎This is not a requirement, but it is good practice.↩︎
Technically, we will call it via the wrapper function
devtools::document().↩︎Or so I have heard. By default, I still source an R script of helper functions for my projects, but perhaps this will change as I become more comfortable with building R packages.↩︎
And it’s likely more than what I’m able to do in a single day.↩︎